
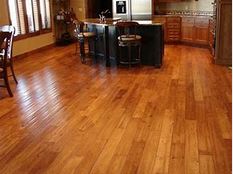
What’s the Importance and Value of Floor Sanding?
Floor sanding is an intensely satisfying DIY activity. With just the right planning, hardwood floor sanding even for a modest-size home can be as little as a single weekend project. But as with any do-it-yourself (DIY) projects, do-it-the-right way means more than just starting and finishing.
As with any DIY project, safety is paramount. Sanding wood floors is no different. For best results, it’s crucial to have the necessary equipment. The type of sandpaper you use will depend on your intended purpose, but for general hardwood floor sanding, fines and carbide-coated sandpaper are usually acceptable. Of course, if you intend to refinish your hardwood floor, you’ll need a better tool than that for refinishing. Make sure you’re using the proper refinishing materials.
You should always start sanding at the edge, not inside the room. Doing so can create a smoother and reduce the amount of “cavity” areas inside the room where moisture can build up and cause warping. Start by sanding the wood flooring as flat as possible. Once it’s reasonably smooth, it’s a good idea to run a sander through the wood floor to get rid of any of the rough spots before beginning refinishing.
Never start Floor Sanding Adelaide until all of the nails have been removed from all cross boards and planks. If you’ve already sanded your floors, re-sanding them won’t be necessary. If you haven’t sanded the wood before refinishing, begin at the floor’s edge. Begin with fine sandpaper and wipe away the existing finish. Use only coarse sandpaper for this purpose, as wood floors need to be sealed to prevent moisture from seeping in.
You’re almost finished – the last thing you need to do is fill in the remaining unfinished areas. If you didn’t sand your wood floor buffer, you will probably need to buy a new one to fill in the areas that your sanding screen couldn’t reach. The recommended buffer for refinishing wood floors is a 4500 grit sander. You can purchase a sander at your local flooring store or from online suppliers.
 Finish sanding removes any scratches and imperfections on the floors. If there are spots on the floor that you cannot reach, this is fine. The goal of sanding is to give the floors a smooth surface. However, if there are still imperfections after sanding, then finish sanding removes those imperfections as well.
With your sander, you should be ready to start finishing the floor. You may need to bring in the sanding machines as well. If so, you should be ready to start sanding. The goal of sanding is to create a flat and smooth surface. When you are sanding, make sure that you wear eye protection, gloves and a mask to prevent dust from getting in your eyes and lungs.
When the Floor Sanding Adelaide is done, you should be left with smooth floors. You might need to reapply the primer to the first cut lines if there were any pits. If so, all you have to do is fill in the holes. Sanding is an essential part of floor wood flooring maintenance.
First, you will remove the floor. To do this, you should open the door of the closets or doors where the boards are located. Then you should use a wet or dry vacuum to remove baseboards and all parts of the floor, including joint corners. It is essential to remove baseboards before sanding. This is because you don’t want to damage the wood if you accidentally said the wrong thing.
After removing baseboards, you should close the doors and windows where you are sanding. After that, you should close all other doors except the one that you are working on. When you have finished sanding the floor, you should vacuum it. Sanding is a straightforward task to complete. There are no complicated steps involved.
The second step in taking out the old floor siding is to remove the edging with a big machine. The reason for doing this is to give your floor before sanding a nice even layer. Having a flat floor before sanding will help the process go more smoothly. With the edging removed, you can move on to removing the first few panels. In the beginning, it may be necessary to use a power sander on all the panels.
Once you have all the panels sanded, you should close the room’s sash where the finish is being applied. This is where you will start to work on using a sanding screen. While sanding, you should always use the same pressure as you did with the sander. This helps to ensure even and consistent sanding. If you have never done any sanding before, you should consider hiring a professional to complete this process.